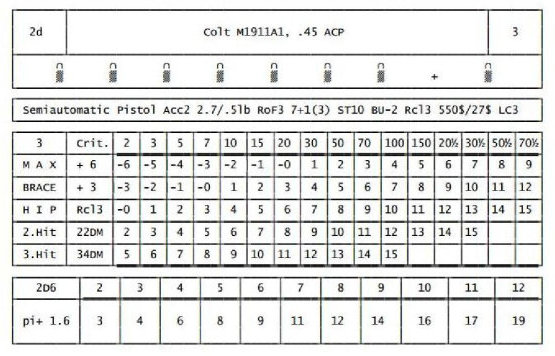
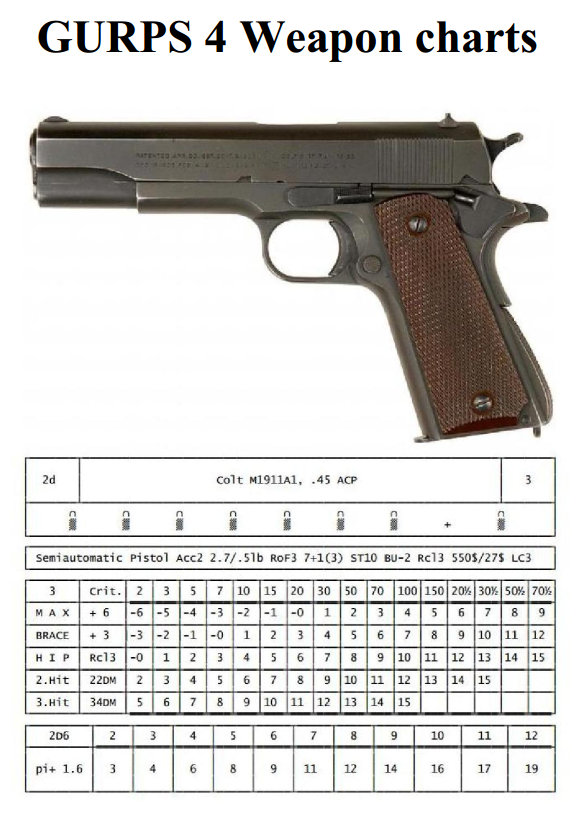
This article describes how to use the following weapon charts.
The table above contains 4 blocks underneath the picture of the weapon.
Block 1 Name and Ammo
This block contains basic weapon information starting with damage on the left, followed by the name of the weapon + ammunition type, and the rate of fire on the right side. Below that you find a representation of the bullets, to check off during combat.
Block 2 Game data
The basic GURPS 4 game data. Weapon type, Accuracy, gun weight and ammo weight, rate of fire, magazine and reloading time, minimum Strength, Bulk, recoil, prices and LC.
Block 3 Targeting
Top row
1. Reloading time
2. Weapon malfunction code.
3. Range to target usually from 2 to 700. Weapons with a very high range might shift (e.g. From 7 to 3000). If the last 0 is replaced by a ½ this means half damage at this range.
The second row contains
1. M A X this is the Maximum aim bonus you can reach with this particular weapon. It contains braced, Accuracy including optics, 3 seconds aiming, it does not include +1 for an All out attack. It usually takes 4-5 game turns to reach this state.
2. + # The actual modifier used.
3. The modifier in correspondence to the range in yards.
The third row contains
1. BRACE: This means firing from a Weaver or Isosceles stance plus 1 second of aiming, so it consist of Accuracy +1.
2.+ 3. as above.
The fourth row contains
1. H I P. This is the GURPS standard without any modifiers,
2. Recoil of the weapon
3. as above.
Row 5+.
1. #.Hit. This is for weapons with a ROF of 2+. It is the same as H I P with one point for brace minus Recoil times the number (#) of shots fired. I included the one point for brace because I assumed that no one would do a double tap or even fire on full auto, without making sure that recoil is checked.
2. This number “##DM” means the average Damage you would achieve if you achieve the hit number.
Block 4 Damage
This table contains 2 rows, the top row is the result of your damage dice, the lower row the resulting damage. This table will only be generated if you damage is not 1d, 2d or 3d and pi. In addition I converted any damage of more than 3d to a 3d throw. In this case you will find a DRx# in the left corner of the 2nd row. This is the amount by which you have to multiply the DR of armor before you subtract it from the value in the second row.
How to use this table:
1. State your firing stance, e.g. MAX, BRACE, HIP and use the corresponding row.
2. Roll 3d and subtract them from your skill.
3. Add or subtract other modifiers (e.g. target size and speed, modified strength )
4. Check the distance and note the target number in the column.
5. If the result is lower or equal the target number in the column you have hit the target.
6. If you fired more than one shot check the row for 2.Hit.
Example: Steve (GUNS(PISTOL)-15) shoots his trusty M1911 from a weaver stance at a target 5 yards away. Brace at 5 yards is a modifier of -1. He rolls a 6 on 3d and subtracts them from 15. The result is a 9.
9 is higher than -1. That’s the first hit.
9 is also higher than 4 (2.Hit at 5 yards) and
9 is also higher than 7 (3. Hit at 5 yards)
Steve has hit the target with 3 bullets.
Now you look at the number number in the column after 3.Hit. 34DM means he did a whopping 34 damage to the target – and all this with rolling dice only once.
If he chooses to roll the damage separately he would consult the damage table in Block 4. He rolls a n 9 with 2d, that corresponds to 14 points of damage. The damage table takes all modifiers into account so it is 9 times 1.6 = 14.4 rounded down to 14 (The 1.6 modifier is from Loadout: monster hunters, page 9 “Bigger is better”, I use it instead of the 1.5 from pi+) He rolls a 6 = 9 damage and a 7 = 11 Damage. 14+9+11 = 34 same as the DM value in Block 3.
